Cheryl's Hat Chat - How is a Leather Halo is Made?
Every wonderer what goes into handmade, hats? The beginning stages for making a leather halo base..
HANDMADE HEADWEARHATMAKING HATS NEW BEGININGSMILLINERYNEW BUSINESS
It’s been a funny old week as the expression goes! I am sort of unemployed, have to keep reminding myself, I am a milliner. Though I do need to find a part-time role, to support myself, while I establish my hat business. If anyone knows of a 3 day a week, admin/customer service or HR role in the Pinner area? Do let me know, thanks.
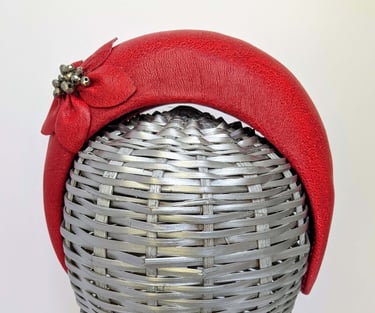
After enjoying wearing my red leather halo out for the night last week, so comfortable, whilst giving that feeling I savor when wearing a hat: elevation, confidence and feel-good factor. It feels appropriate at this point to mention, anyone who wants to criticize my text, I am no fan of the written word, grammatically I am appalling, put me down if you like, for me doing this is part of my desire, need to make my hat business a success. Sorry, I digress, I decided to make a limited-edition collection of halos, they fit so well into my current exploration taking inspiration from Russia. Referencing the historic poster art, from the early years of the Revolution to the later 20th century, advertising theatre, cinema, ballet and circus, the red colour is so dominant.
As usual, I am not as far ahead with the collection as I hoped, I have a further two halos moulded, one lining, and no embellishments finished. This is only the beginning of what goes into completing the final product. I hope by sharing this you will understand a bit more, about why couture millinery products have the price point it holds.

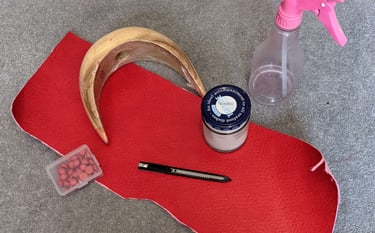
Required Materials and Tools:
Cut of leather, halo hat bock, blocking pins, water spray bottle, diluted PVA glue, craft knife.
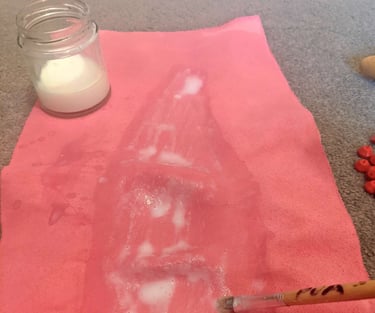

Step 1: Spray the leather with water, not so it is soaking wet, but with enough water, that the moisture gives the leather increased flexibility. Stretch left to right and diagonally, softening the leather. Wrap the leather over the halo block to see where it is going to sit within the leather, remove and coat this area with PVA.
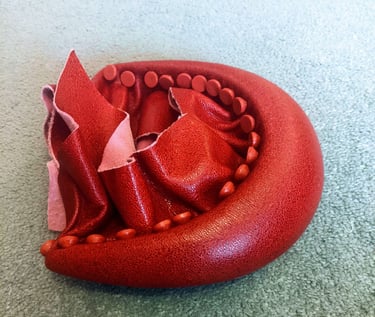
Step 2: Replace the leather back over the halo hat block, pin in the center at the underside of one side of the block, smooth the leather over the top of the block and pin the opposite center underside. Start to mound the leather over the block, stretching all the time. This is a great upper body workout! Continue to pin down each side, caressing the leather to mould to the wooden form, smoothing out the creases. The pins are repeatedly removed, the leather re-stretched, and the pins inserted, duplicate this process until you have a smooth surface, and the underneath of the block has pins holding the leather in place all the way around. This process takes about an hour.
Step 3: Leave to dry, at an average temperature day, approx. 18c, I leave for a day and a half.

Step 4: Remove the blocking pins, do this with care they are incredibly sharp, I use an olive fork as it hooks underneath the pins perfectly.
Step 5: Use a shape craft knife cut the excess leather away, leaving about 7mm all the way around,: inwards from the bottom edge crease.
Step 6: Make a wireframe that fits inside the bottom edge crease about 1-2 mmm inside the halo, I use 1mm cotton-covered wire, overlap the wire by approx. 3cm and secure with sellotape.
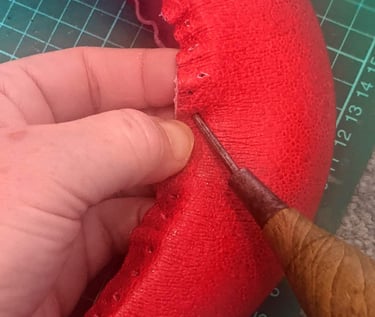
Step 7: Using an awl, pierce holes approx. 5mm apart all the way around the inner edge approx. 2mm in from the bottom edge crease, this is where you are going to place the wire.
Step 8: Sew in the wire to the halo, use blanket stitch, go through the leather around the wire, back through the leather, knot stitch approx. every 3 stitches.
Steps 4 – 8 takes about 2.5 to 3 hours

I am going to leave the process at this point, the lining to be moulded be on the block, doesn’t take quite a long as mould as the leather, embellishments to be made, attached to headpiece, lining inserted and braid secured to the inner edge, finally the milliner can sew their label in place.
I hope you have enjoyed reading this insight the beginnings of the steps it taken, to make a leather halo? It may be taking me slightly longer than normal to make these, due to my desire to be as sustainable as possible, as a business, the leather is thicker than they type of leather normally used. But is such beautiful product I have to use it, I do hope you like the finished product?

If you would like to pre-order, a limited-edition red leather halo, part of the A Little Bit of Sparkle Collection, use the Contact Form, telephone or email me found in the footer of this page, or to view my other ready to wear one-off hats, fascinators and hairbands visit my Portfolio page.
I have decided due to being starved of time, I am going to publish my blog bi-weekly.
See you in two weeks, get those hats, fascinators or halos on, and get the feel-good factor :-)
Love Cheryl x